If you've ever dealt with a leaky outdoor faucet or a pipe bursting after a chilly winter night, chances are your hose bib is the culprit. That little fixture, sometimes referred to as an outdoor faucet, wall hydrant, sillcock, or spigot, might seem small, but it’s a big player in your home’s plumbing system. Whether you’re watering your garden, washing your car, or filling up a pool, it’s there, making things happen.
This guide isn’t just about hose bib replacement. We’re here to help you figure out when it’s time for a swap, why upgrading to a frost-free hose bib is a smart move to avoid freezing damage, and how to pick and install the right one. If you’re dealing with never-ending drips or want to get ahead of the cold weather, this guide has you covered. With a little know-how, you can protect your home and feel good about upgrading your plumbing.
When Should You Replace a Hose Bib? Key Warning Signs
Sometimes, a little repair can go a long way. We carry excellent service kits like the Mansfield Vacuum Breaker Replacement Kit, the Prier Complete Wall Hydrant Service Repair Kit, and the Mansfield Wall Hydrant Service Kit. These are fantastic for addressing minor issues and extending the life of your existing hose bib.
However, if you find yourself constantly reaching for these kits, especially every spring when you turn the water back on, that's a HUGE red flag. If you're frequently replacing parts like the Mansfield Stem Assembly, it's a clear sign that your current hose bib might not be up to the task, or perhaps it's simply past its prime. Here are some other tell-tale signs it's time for a full replacement:
Constant Leaks and Water Waste
Drips, even small ones, can waste a lot of water and potentially damage your home's foundation over time. If tightening doesn't stop the leak, or if it returns quickly after a repair, it's time to upgrade.
Rust, Corrosion, and Stiff Operation
Visible rust or greenish-blue corrosion on your hose bib or around its connection to your home is a clear warning sign. These issues signal deterioration, which can weaken the metal and eventually lead to leaks or even a burst pipe.
If turning the handle feels like a workout or it gets stuck open or closed, that’s another red flag. A stiff or hard-to-operate hose bib isn’t just frustrating to use; it usually points to internal wear that needs attention.
Water Pressure Problems
If your outdoor water pressure has significantly decreased through the hose bib, it could be due to internal blockages or a failing valve.
Winter Freezing Damage
If you diligently drain your hose bib every winter but still experience problems like burst pipes or internal damage when the temperatures drop, you likely don't have a frost-free hose bib, and it's time to seriously consider an upgrade.
Why Upgrade to a Frost-Free Hose Bib or Outdoor Faucet?
A standard hose bib has its shut-off valve right at the exterior wall of your home. This means water sits in the pipe leading to the spigot, making it vulnerable to freezing and bursting in cold weather.
A frost-free hose bib, on the other hand, is designed to prevent this very problem. Its shut-off valve is located inside your heated home, several inches from the exterior wall. When you turn off the water, the remaining water in the spout drains out, leaving no water exposed to freezing temperatures. This simple design difference is a game-changer for colder climates, protecting your pipes from costly and damaging bursts.
There are even options with hot and cold water! Imagine being able to wash your car with warm water on a chilly day, fill a kiddy pool with a comfortable temperature, or even bathe your muddy dog without the shock of icy water. The C-108D08 provides both hot and cold water right at your exterior wall, all while maintaining the crucial frost-free design and anti-siphon protection that keeps your plumbing safe. The Prier 8-Inch Hot and Cold Anti-Siphon Hose Thread Wall Faucet with Vacuum Breaker is a great two-handle option, and adding a Prier Freezeproof Outdoor Shower Adapter makes this an affordable option for an outdoor shower to pair with a pool, hot tub, or a home on a lake! The Prier 8-Inch Single Handle Hot and Cold Mixing Hydrant is an elegant and sleek single-handle design for a hot and cold hose bib where a high-quality finish and the aesthetic of the home are important.
Top Frost-Free Hose Bibs We Recommend
Here are some of the excellent frost-free options we offer at Plumbing Deals, along with their features and benefits:
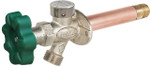
Prier 10-Inch and 12-Inch Anti-Siphon Wall Hydrants with 1/2-Inch Inlet

Features
The Prier 478-10 10-Inch Anti-Siphon Wall Hydrant and the Prier 478-12 12-Inch Anti-Siphon Wall Hydrant with 1/2-inch inlets are top-of-the-line frost-free options. "10 inch" and "12 inch" refer to the length of the stem, allowing the shut-off valve to be placed well within your home's heated space. They also include an anti-siphon vacuum breaker, which prevents contaminated water from being siphoned back into your potable water supply—a crucial safety feature! The 1/2-inch inlet is a standard size for most residential applications.
Benefits
Superior freeze protection, preventing costly pipe bursts. Built-in backflow prevention for water safety. Durable construction for long-lasting performance.
Prier 14-Inch Anti-Siphon Wall Hydrant with 3/4-Inch Inlet

Features
Like the above, but with an even longer 14-inch stem and larger inlet, the Prier 479-14 14-Inch Anti-Siphon Wall Hydrant with a 3/4-inch inlet provides maximum frost protection, especially in homes with thicker walls. The 3/4-inch inlet allows for higher water flow, which can be beneficial for larger watering tasks or if you have a larger garden.
Benefits
Enhanced freeze protection. Higher water flow for faster filling of buckets, sprinklers, or pressure washers. Anti-siphon safety feature.
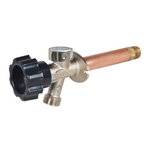
Prier 10-Inch and 12-Inch Anti-Siphon Quarter-Turn Wall Faucets with Soft-Grip Handle and 1/2-Inch Inlet
Features
The Prier P-164D10 10-Inch Wall Faucet and the Prier P-164D12 12-Inch Wall Faucet combine the benefits of frost-free design and anti-siphon protection with the convenience of a quarter-turn operation. No more endlessly cranking the handle! Plus, the soft-grip handle provides comfortable use.
Benefits
All the advantages of frost-free and anti-siphon design, plus effortless quarter-turn operation. Ergonomic soft-grip handle for comfortable use.
How to Replace a Hose Bib: Step-by-Step Instructions
Replacing a hose bib is a manageable DIY project for most homeowners, but if you're uncomfortable with plumbing, don't hesitate to call a professional! The process is fairly straightforward, but the connection method will vary depending on your existing piping material.
Tools and Supplies You’ll Need
- New hose bib (we'll discuss options below!)
- Adjustable wrenches
- New copper or PEX pipe (I try and stick to whatever material is already there. If you have another material, like CPVC or galvanized, consider adapting to PEX.)
- For threaded connections: Pipe dope or Teflon tape
- For copper connections: Soldering torch, solder, flux, and sandpaper/emery cloth
- For PEX connections: PEX crimp tool or expansion tool, and appropriate crimp rings or expansion sleeves
- Bucket or towels for drips
- Wire brush (optional, for cleaning threads)
- Safety glasses and gloves
Disconnecting the Old Hose Bib
- Turn Off the Water: This is critical. There should be an isolation valve inside your home that feeds only that particular spigot you are trying to replace. If not, locate the main water shut-off valve to your home and turn it off.
- Drain the Line: Open the hose bib to release any residual water in the line.
- Disconnect the Old Hose Bib: This is where your pipe type comes into play:
- For Threaded Connections (Galvanized, some older copper): Use your adjustable wrenches to carefully unthread the old hose bib from the supply pipe. Be prepared for a small amount of water to come out.
- For Copper Soldered Connections: Cut the water line between the shut-off and the hose, and be prepared for some water to come out of the cut. Using a RIDGID 1/2 and 3/4-Inch C-Style Close Quarters Tubing Cutter is a great option for cutting the line in spots where space is limited.
- For PEX Connections (Crimp or Expansion): If you have a crimp connection (PEX A or B), you'll need to cut the line with a Milwaukee 48-22-4204 PEX & Tubing Cutter.
- Prepare the Supply Pipe:
- For Threaded Connections: If necessary, use a wire brush to clean any old pipe dope or rust from the supply pipe threads.
- For Copper Connections: Use sandpaper or sand cloth to thoroughly clean the outside of the copper pipe where the new fitting will be soldered. Apply a thin, even coat of flux to both the pipe and the inside of the new hose bib's copper fitting.
- For PEX Connections: Ensure the end of your PEX pipe is cleanly cut and free of burrs.
Installing a New Hose Bib (Threaded, Copper, or PEX)
- For Threaded Connections: Apply a generous amount of pipe dope or wrap several layers of Teflon tape clockwise around the male threads of your new hose bib. Carefully thread the new hose bib onto the supply pipe. Hand-tighten first, then use your wrenches to tighten it securely. Be careful not to overtighten, as this can damage the threads.
- For Copper Soldered Connections: Slide the new hose bib onto the prepared copper pipe. Heat the joint evenly with your soldering torch until the flux bubbles. Touch the solder to the heated joint, and it will be drawn into the connection. Once a bead of solder forms all around the joint, remove the heat and let it cool naturally.
- For PEX Connections:
- Crimp (PEX A & B): Slide a crimp ring onto the PEX pipe. Push the new hose bib's PEX fitting fully onto the pipe. Position the crimp ring over the fitting's barb and use your PEX crimp tool to crimp the ring securely.
- Expansion (PEX A): Slide a PEX expansion sleeve onto the PEX pipe. Insert the jaws of your PEX expansion tool into the end of the PEX pipe and expand the pipe and sleeve. Quickly push the new hose bib's PEX fitting fully into the expanded pipe. The PEX will naturally shrink back, creating a secure connection.
Final Leak Check and Troubleshooting
- Turn On the Water: Slowly turn the water back on, first at the isolation valve (if you used one), then at the main shut-off.
- Check for Leaks: Inspect all connections for any drips or leaks. If you see any, address them immediately: tighten threaded connections slightly, or for soldered/PEX connections, you may need to re-do the joint.
In summary, upgrading from a standard hose bib to a frost-free model is one of the best investments you can make for your home's plumbing system. It saves you from the frustration and expense of burst pipes, offers crucial water safety with anti-siphon features, and provides reliable outdoor water access for years to come.
Don't wait until you're dealing with a flooded basement or a burst pipe in the dead of winter; reach out to our experts to find the right frost-free hose bib for your home or project.